Un peu lassé d'avoir 3/4 télécommandes différentes pour piloter ma Box Bouygues Sensation, mon home cinéma LG, mon lecteur DivX Pop Corn Hour A300 et ma télé Sony, j'ai décidé d'acheter la télécommande Harmony Smart Control universelle (sans écran) qui est moins chère que celles qu'on peut trouver habituellement.
En vente chez Amazon ici: http://www.amazon.fr/gp/product/B00CGYG81S ou encore chez Logitech directement : http://www.logitech.fr/fr-fr/product/harmony-smart-control?crid=60.
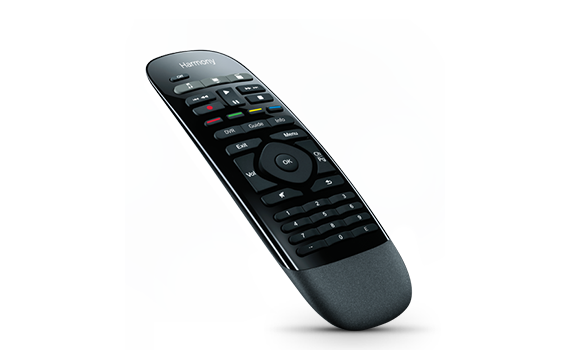
Cette télécommande permet sans problème de remplacer toutes les télécommandes que j'avais ! La télécommande est 'RF' (pas infrarouge) donc on n'a pas besoin de l'orienter vers les équipements pour changer de chaine ou autre. Elle est par ailleurs très fine et agréable au toucher.
La télécommande
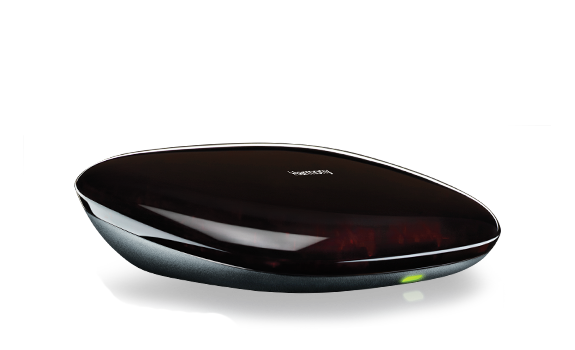
La télécommande communique avec un 'hub', un petit élément noir design qui doit être positionné près des éléments à piloter et c'est le 'hub' qui envoie les signaux infratouges vers les équipements. Il y a également un petit émetteur infrarouge supplémentaire qui peut être déporté plus loin si les équipements sont un peu éloignés. On peut même envisager de tout mettre dans un placard !
Le hub
Elle pilote donc chez moi :- une télé SONY Bravia,- une BBOX Sensation,- un home cinéma LG,- un lecteur DivX PopCorn Hour A300,- une Nintendo Wii.La configuration de la télécommande se fait depuis 'MyHarmony.com' à partir d'un Mac ou PC idéalement. C'est possible à partir d'un smartphone mais c'est moins simple.
A noter que le câble USB qui est fourni doit être raccordé entre le Hub et le PC/Mac la première fois afin de le configurer correctement. Il se connectera alors au réseau Wifi de la maison pour pouvoir communiquer avec une tablette ou un smartphone ultérieurement.
Le seul truc qui manquait c'est le changement de piste audio depuis la télécommande (pour les langues) sur le lecteur DivX : j'ai ajouté ça facilement en configurant une touche inutilisée. Pareil pour la BBox, la touche 'Home' ne faisait rien et je l'ai configurée pour qu'elle remplace la touche 'bleue' de la Bbox qui permet d'accéder au menu et d'aller voir le replay ou de programmer des enregistrements. Rien de bien grave donc !
Une fois configurée, en une touche de la télécommande, ça allume la télé, la BBox et le home cinéma, configure les appareils sur les bonnes entrées et il n'y a plus qu'à monter le volume et changer de chaine : la télécommande sait à quel appareil 'parler' pour effectuer toutes les actions.
Une autre touche pour regarder un film, ça éteint la bbox, ça allume le lecteur Divx et met la télé sur la bonne entrée et pouf on est prêt !
Pareil pour la wii et pour écouter de la musique. En un bouton, on éteint tout.
Les seuls 'trucs' que j'ai
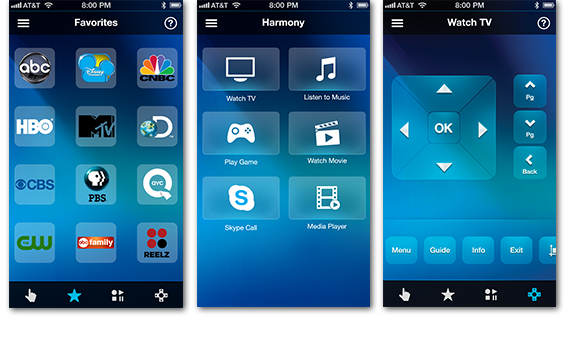
C'est hyper simple et en plus il y a une application SmartPhone et tablette. Cela dit, c'est plus rapide de prendre la télécommande que d'allumer le smartphone ou la tablette.
L'application iPhone
Un produit magique, ne pas s'abstenir !
My car is a Renault Espace with integrated screens at the back of the headrests (infrared transmitter for the sound to headsets) with a DVD Player and an extra RCA audio/video input.Since I was bored with kids battles choosing cartoons from old DVDs I decided to use a Raspberry Pi together with Raspbmc as a media center. Everything had to be powered from the cigar lighter receptacle...I took an old 2.5" hard-drive as the repository for cartoons. Because of power constraints, I bought a 2.1A dual USB car adapter: it provides enough power for the Raspberry Pi and for the hard-drive; one USB cable goes to the power input of the Raspberry and another "Y" USB cable is connected to the USB car adapter, to the Rabspberry Pi USB port and to the hard-drive. Y USB Cable like this one:http://www.lacie.com/lu/products/product.htm?id=10572.I wanted to use my iPad as a remote control for XBMC so the idea was to have a wifi emitter in the Raspberry Pi, to connect the iPad to this Wifi network and to use the official remote control app. So I bought a cheap USB Wifi dongle: D-Link DWA-121 (less than 13€ on Amazon.fr). This dongle has a Realtek RTL8188CUS chipset compatible with the rtl8192cu linux driver already installed on the latest Raspbmc. However, configuring this dongle as a Wifi access point can turn to be a nightmare! So this post is to help people doing the same thing!Here is how to proceed, using your home network first before going into the car.1. Install Raspbmc (http://www.raspbmc.com/download/) on the SD Card.2. Start your Raspberry Pi and let it boot with a connection to your Ethernet network first. 3. Use the official XBMC iPad or iPhone app to automatically detect your Raspberry (your iPhone has to be connected to your home Wifi wich uses the same network as the Raspberry Pi).4. Check the IP address of the Raspberry in the 'Systems' / 'Info' menu.5. From your PC or your MAC, connect to the Raspberry Pi using an SSH terminal (from MacOS, you can go to a terminal and type
- CODE:
ssh -l pi IP_ADDRESS
where IP_ADDRESS is the one you just checked (for example 192.168.1.11). The password is raspberry. Type
- CODE:
sudo -s
to make sure you have sufficient rights on the device.6. You will need to follow this tutorial: http://elinux.org/RPI-Wireless-Hotspot but at the first step you have to change the following code:
- CODE:
sudo apt-get install hostapd udhcpd
by this new code:
- CODE:
sudo apt-get install hostapd udhcpd iptables
7. Later in the tutorial you also need to modify the driver from the file /etc/hostapd/hostapd.conf which is
- CODE:
driver=nl80211
by this driver instead:
- CODE: SELECT ALL
driver=rtl871xdrv
8. The hostapd file also need to be changed before running hostapd. Download the correct version by typing
- CODE:
wget http://dl.dropbox.com/u/1663660/hostapd/hostapd
then move it to the right place by typing
- CODE:
mv hostapd /usr/sbin
and modify the rights by typing
- CODE:
chmod 755 /usr/sbin/hostapd
9. You should have finished the tutorial by now but there is an ultimate modification to be done. I realized that the Wifi interface was not starting, causing the wifi Access Point not to be working... So you have to modify the /etc/rc.local file by typing
- CODE:
nano /etc/rc.local
and adding the following 2 lines before the exit 0 line:
- CODE:
ifup wlan0
service udhcpd restart
10. Restart you Raspberry Pi, check the Wifi from your iPad: you should be able to connect to your newly create access point, to detect your Raspberry Pi from the official xbmc app and to enjoy an autonomous Wifi Raspberry Pi!Pictures from the installation in my car:
Official XBMC iPad app together with Raspbmc in my Renault Espace:
IMPORTANT NOTE:
If you see the SSID but are not able to connect to it that means that it is probably a DHCP issue: your raspberry is not providing an IP address to your iPad. To solve this, we will simply change the DHCP server...First thing to check: if you type 'ifconfig', do you have an IP address for WLAN0 interface? If yes, it is really a DHCP issue.I also had a DHCP issue once and I changed the DHCP server (after a reinstall from scratch). You can do so by typing:
- CODE:
apt-get install isc-dhcp-server
to replace the udhcpd server. So you have to stop udhcpd by typing
- CODE:
service udhcpd stop
Once the udhcpd is stopped and isc-dhcp-server installed, there is a bit of config to be done. You need to change the eth0 line to have wlan0 in the config file:
- CODE:
sudo nano /etc/default/isc-dhcp-server
And then edit the dhcpd.conf file:
- CODE:
sudo nano /etc/dhcp/dhcpd.conf
In this file you need to have this type of config (make sure also than eth0 is replaced by wlan0 in this file):
- CODE:
option subnet-mask 255.255.255.0;
option broadcast-address 192.168.42.255;
option domain-name "home";
option routers 192.168.42.1; #default gateway

subnet 192.168.42.0 netmask 255.255.255.0 {
    option routers 192.168.42.1;
    range 192.168.42.10 192.168.42.20; #IP range to offer
    option domain-name-servers 8.8.8.8, 8.8.4.4;
}
Finally you need to start the dhcp-server:
- CODE:
sudo isc-dhcp-server start
In case of issues, there is a syslog file which gives more details on what fails:
- CODE:
cat /var/log/syslog
If it works, replace dhcpd in the rc.local file by isc-dhcp-server so that it starts all the time on boot.
You're done! Enjoy!